Welcome to Performance Scoring! Change is hard and we get it! Our goal is to provide you and your team with all the information needed for a successful rollout.
Step 1: Core Navigation – Dashboard
Once logged in, your Performance Scoring (Default) Dashboard will appear.
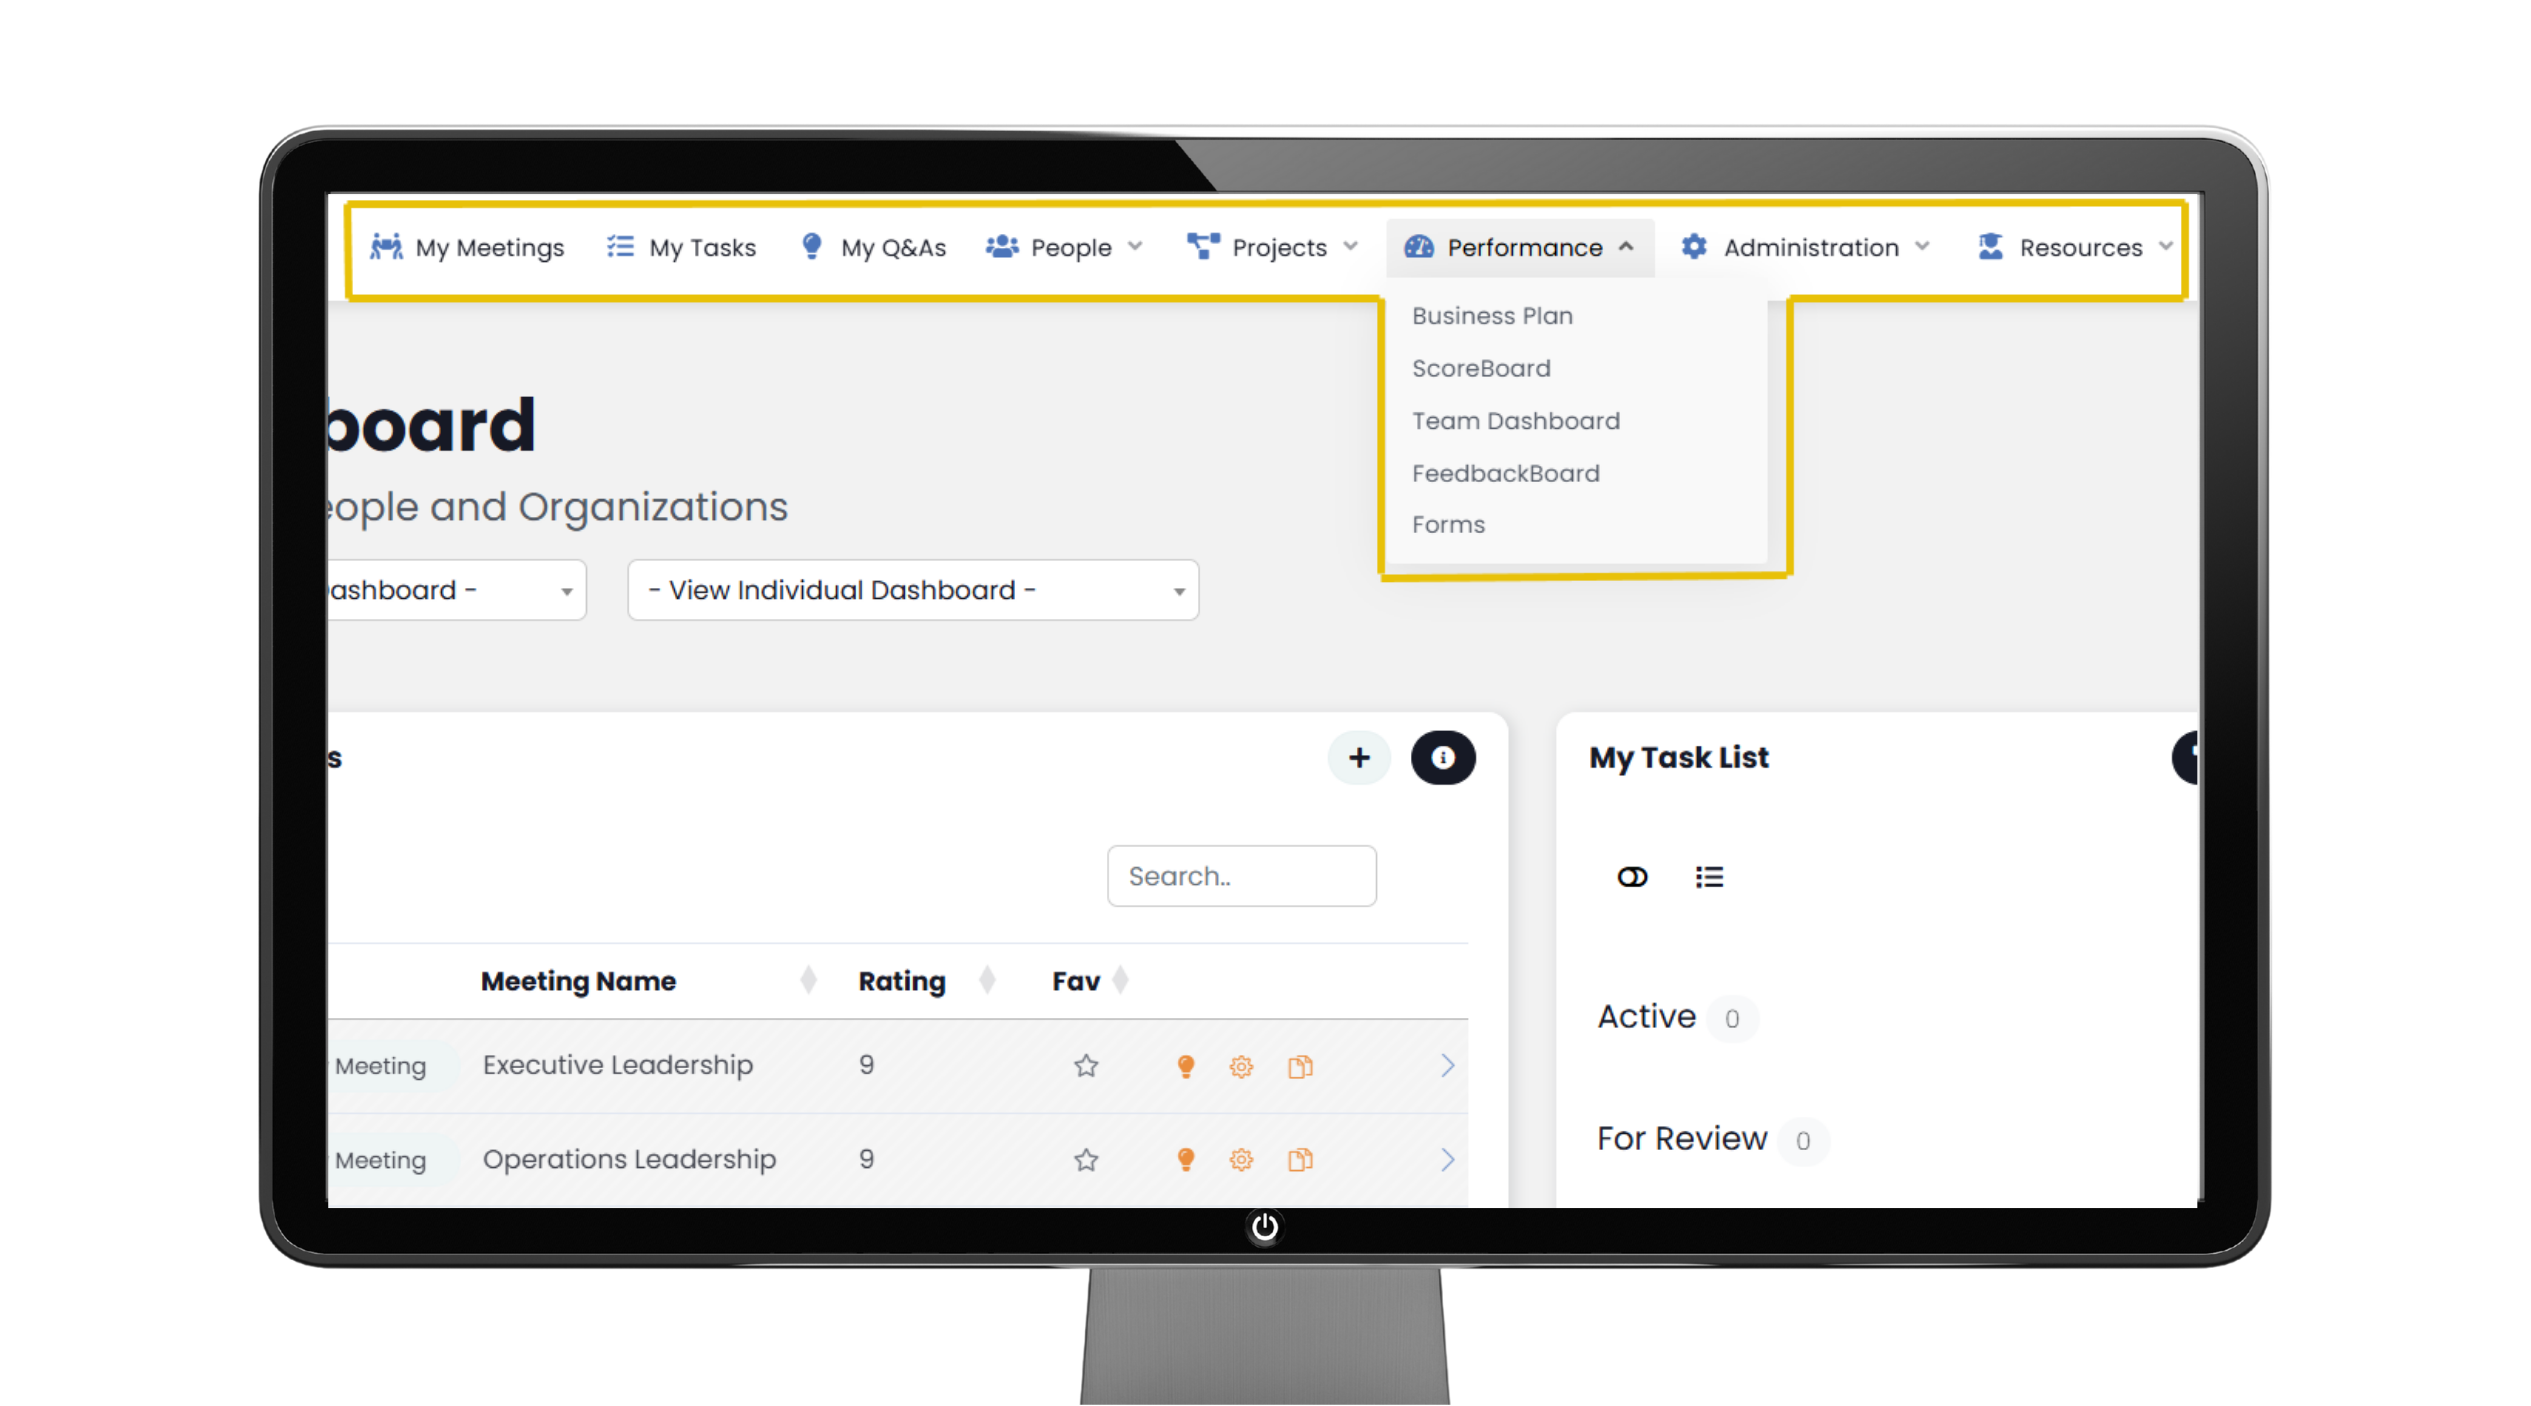
Navigation Panel Overview
At the top of this presentation, you will see your Navigation Panel. The application modules and features are assigned by ‘Role Permission’ within your organization. *Toggle over any item to see sub-items.
Dashboard
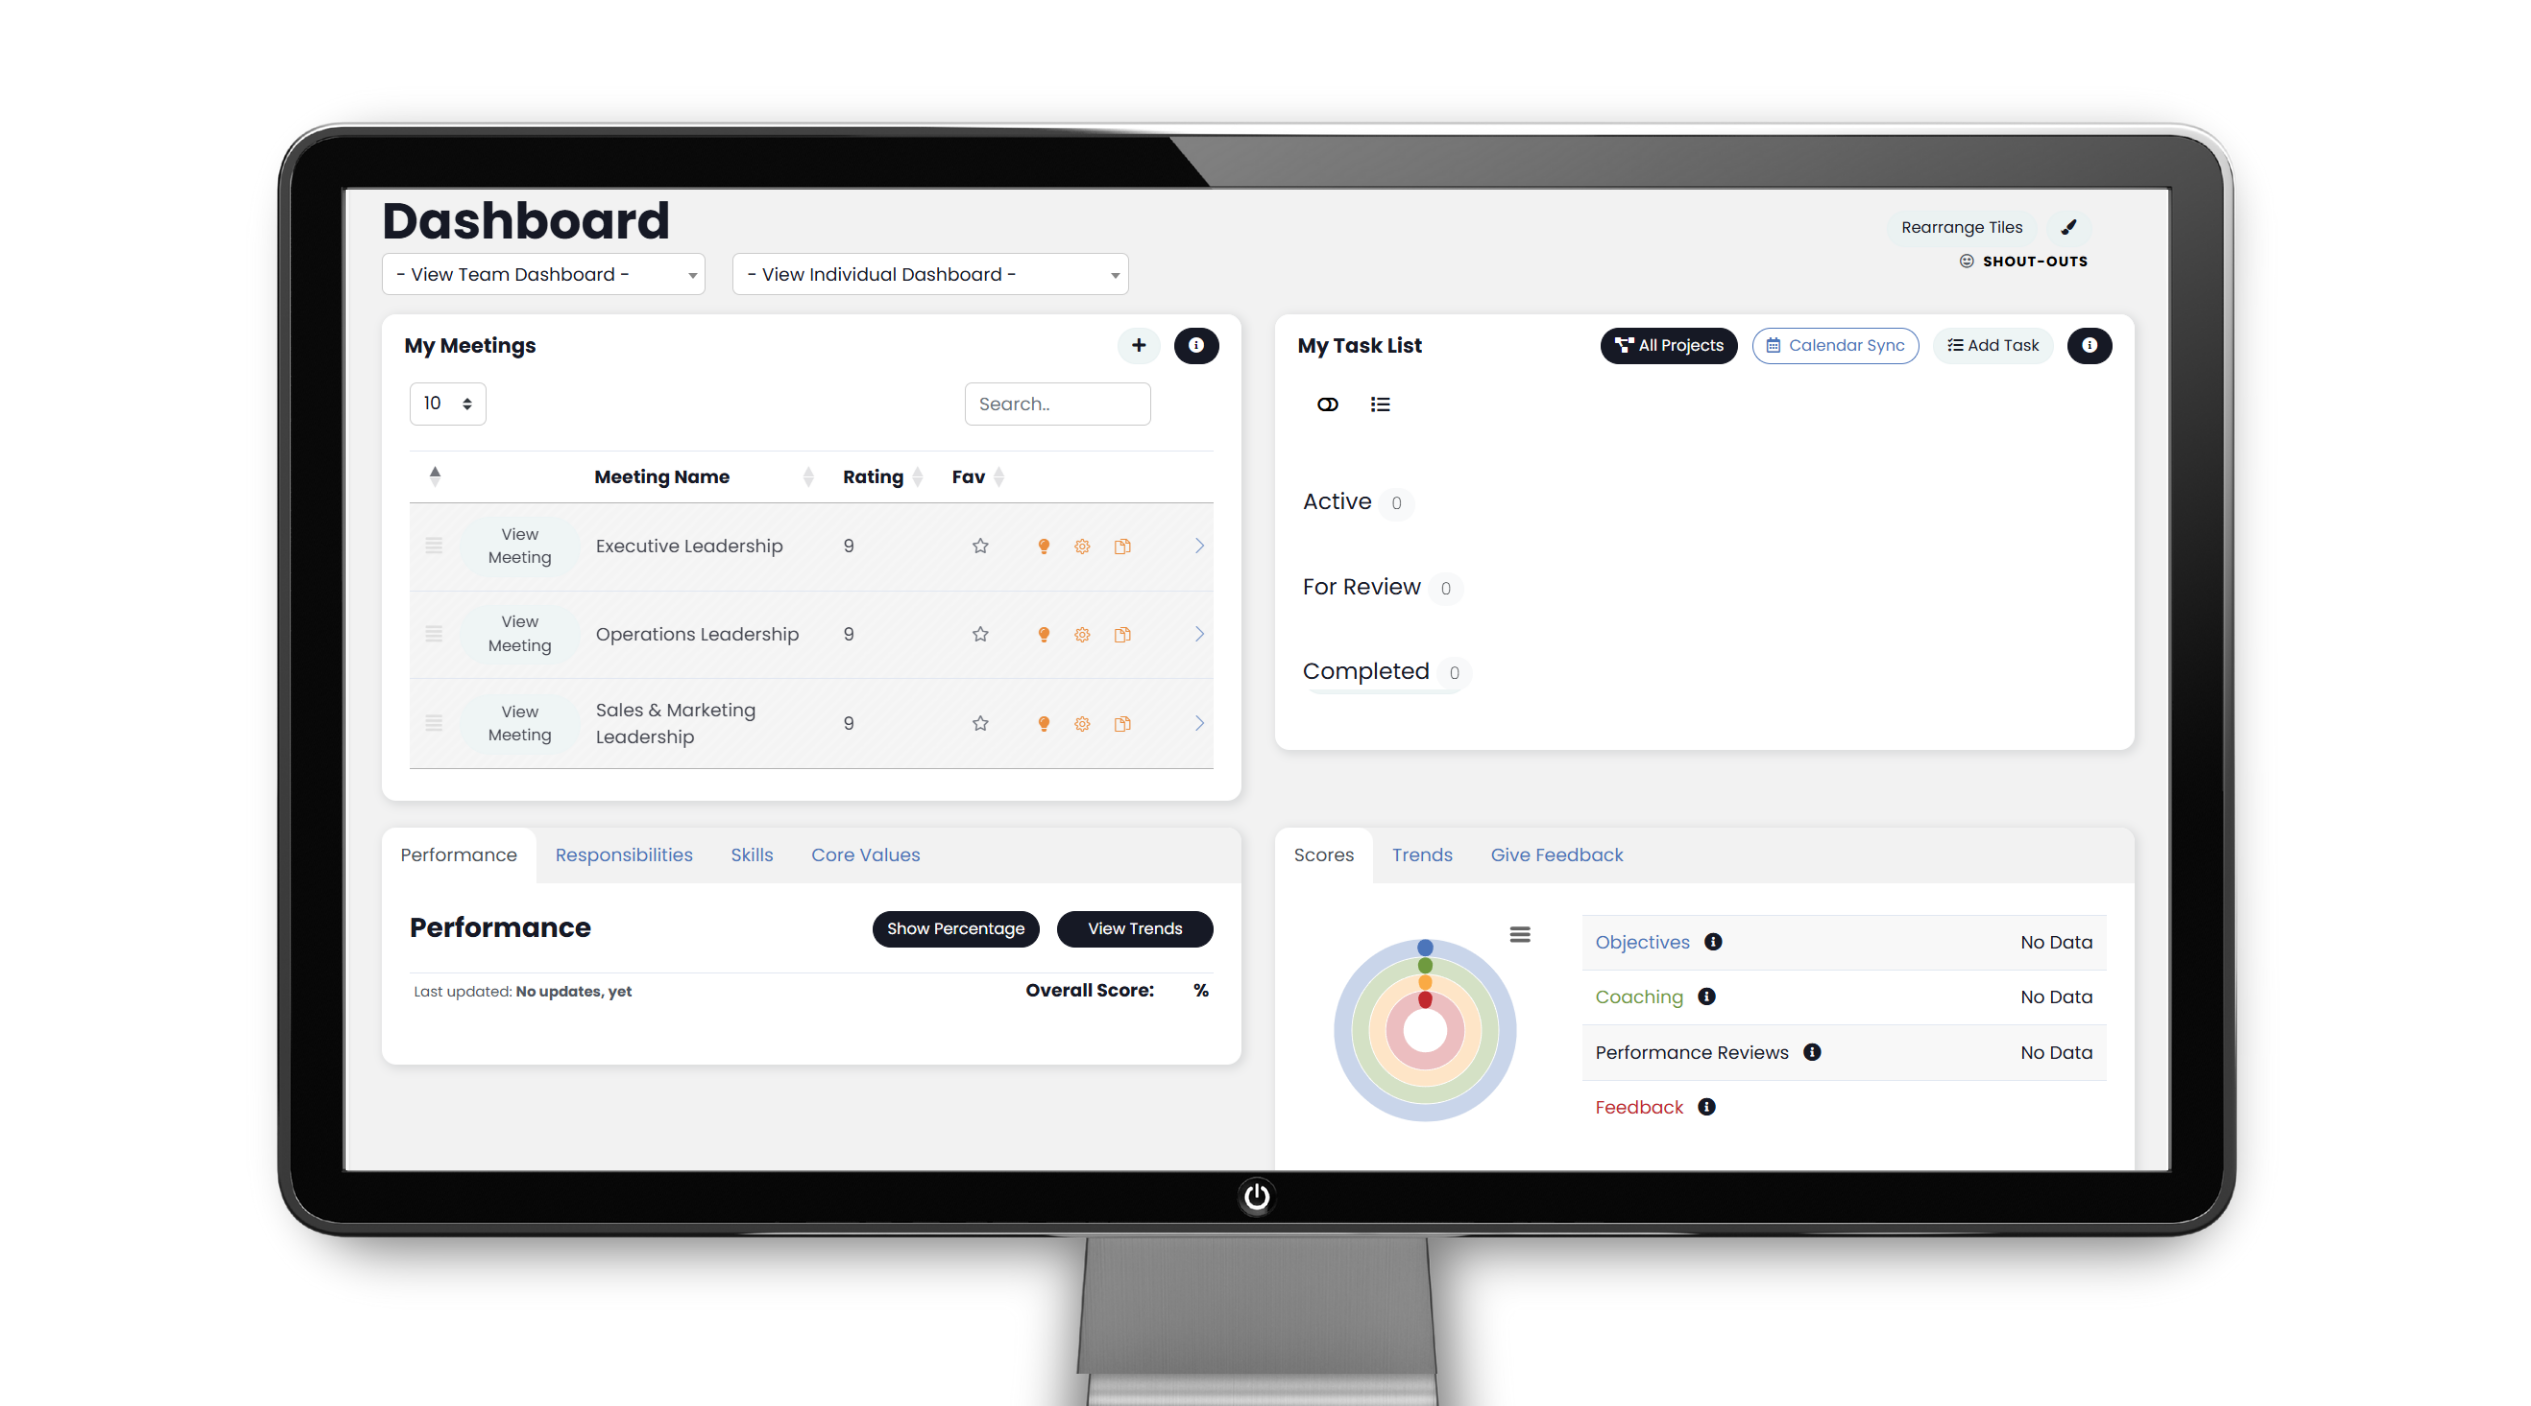
Upon first logging in, your Dashboard will appear mostly empty. This is completely normal in the beginning.
Please, note the following:
· Team & Individual Dashboard
· PERFORMANCE SCORE – Ring chart of Performance, Alignment and Engagement
· FEEDBACK – Metrics, Role & Skill ratings, Core Values and Engagement ratings
· Task List
· My Meetings
*Each Individual (User’s) Dashboard can be reconfigured to include other modules, by using the Paint Brush icon in the top, right corner.


Team and Individual Dashboards
From your main Dashboard, you have access to the reporting & coaching section of the platform via the ‘Team Dashboard’ or the ‘Individual Dashboard’. Use the dropdown feature from either ‘Team Dashboard’ or ‘Individual Dashboard’ to click navigate to a more detailed metrics page.
The ‘Team Dashboard’ is where you will see a scatter plot of users that can be filtered by internal teams for t a quick view of where everyone falls in regard to Performance vs. Alignment. You will also see the team’s Performance Ring Chart for the selected team displaying the team’s average Performance, Alignment, and Engagement.
The ‘Individual Dashboard’ is where you will see a dropdown of your employees/users. Click an individual to view their Performance Rings, Metrics, Coaching Values, To Dos, Rocks and any previous performance reviews or Forms completed for them.
Basic Users do not have the Team and Individual Dashboard views.
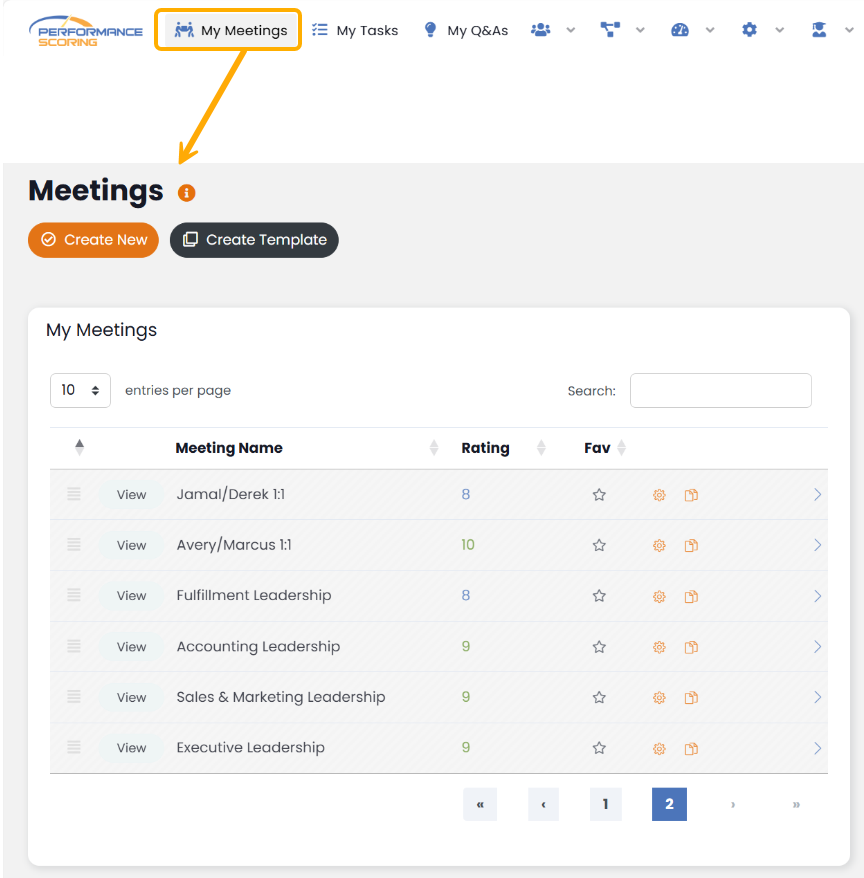
My Meetings
You can access all your meetings via the ‘My Meetings’ found on the main Dashboard or by navigating to ‘My Meetings‘
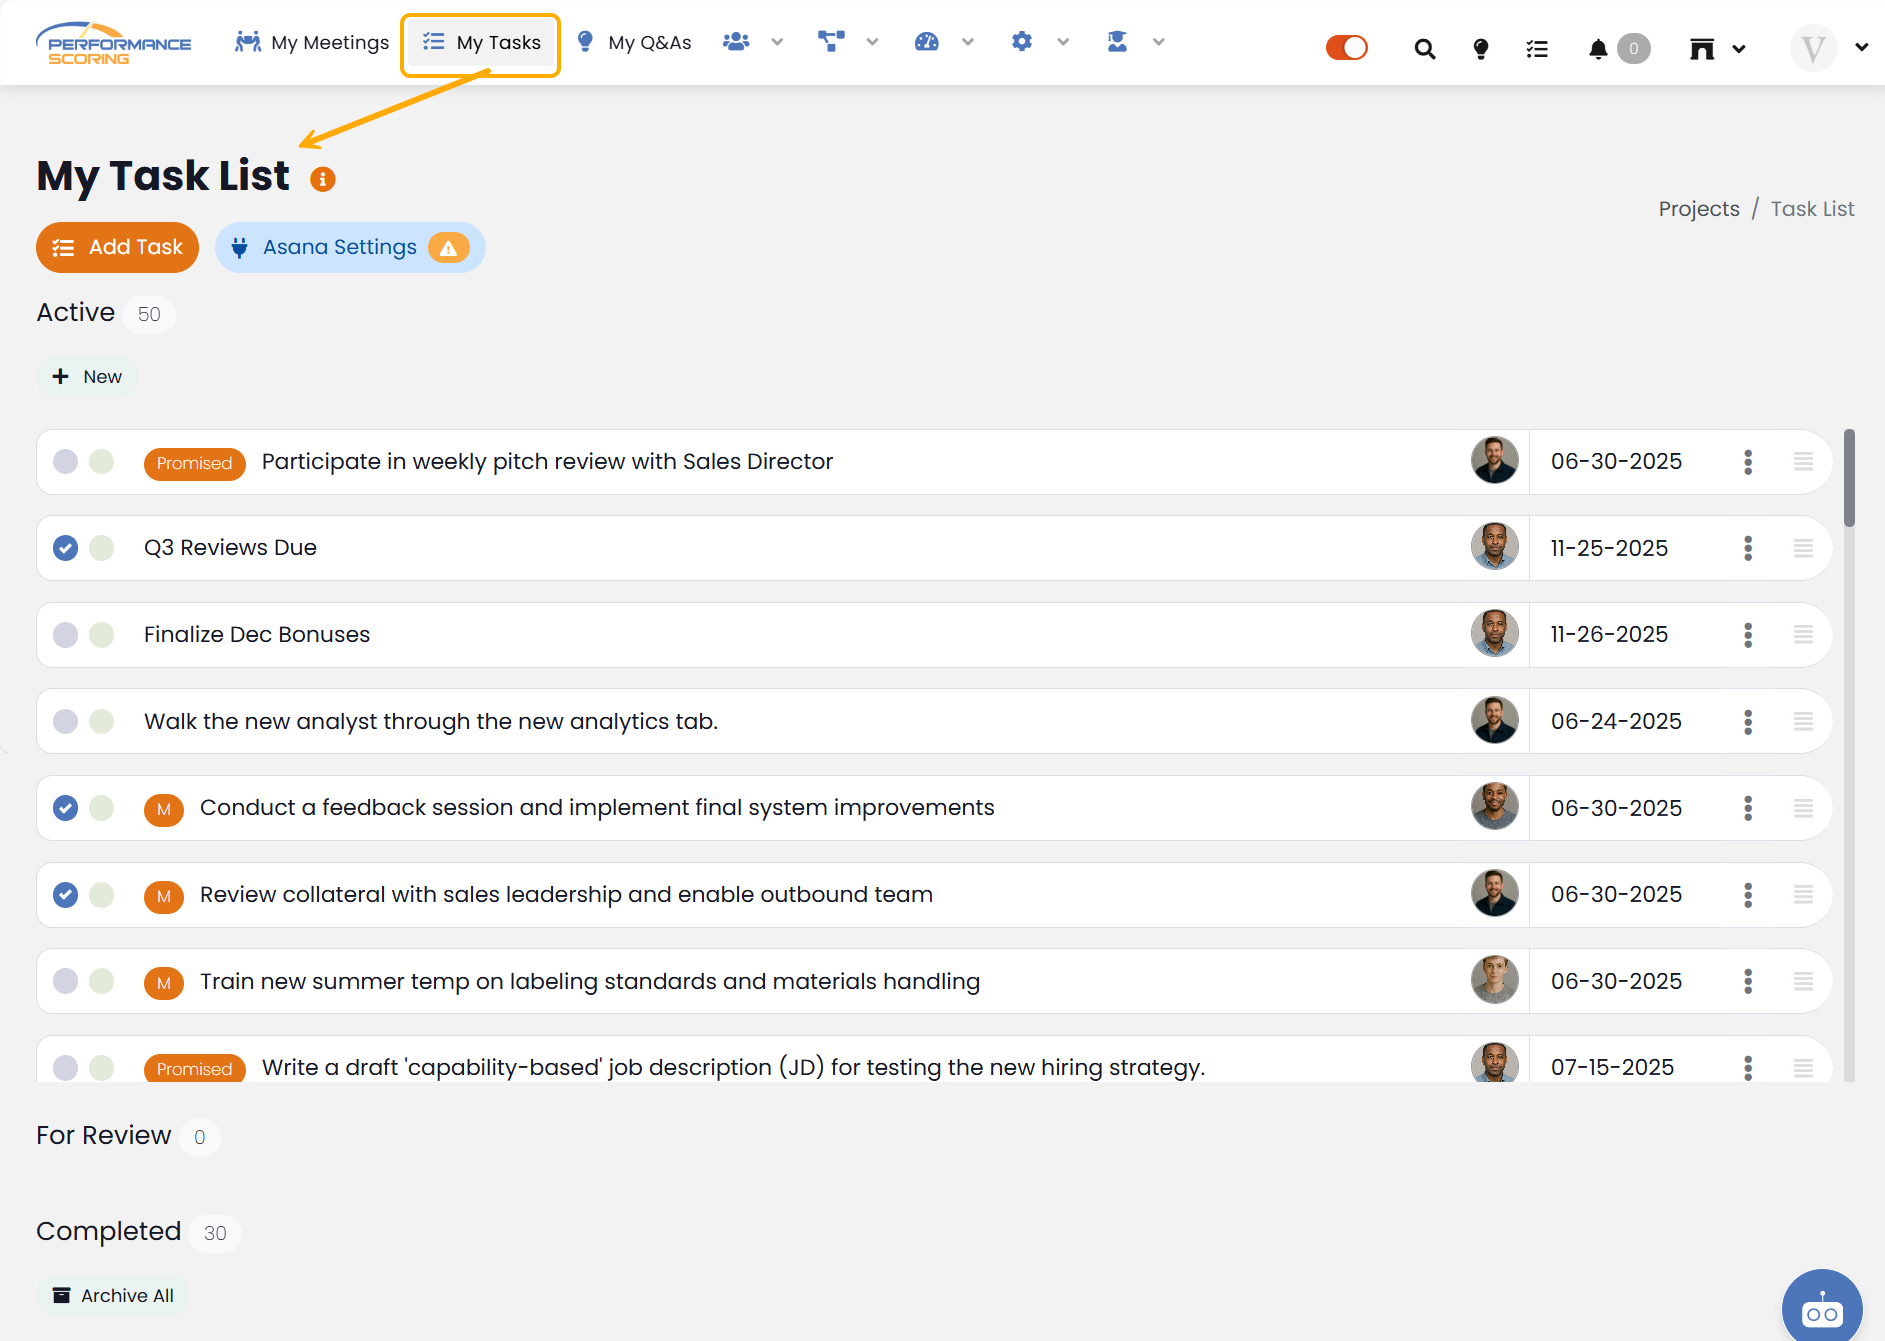
Tasks/To Do’s
Your ‘Tasks’ list can be found on your Dashboard as well as the ‘Navigation Panel’ through the ‘Task List’ Icon. Either location will display all Tasks you have pending as well as those marked complete or waiting for approval.
From your Tasks List, you are able to ‘Add Task‘ as well as ‘Asana Settings‘ if your team uses it.
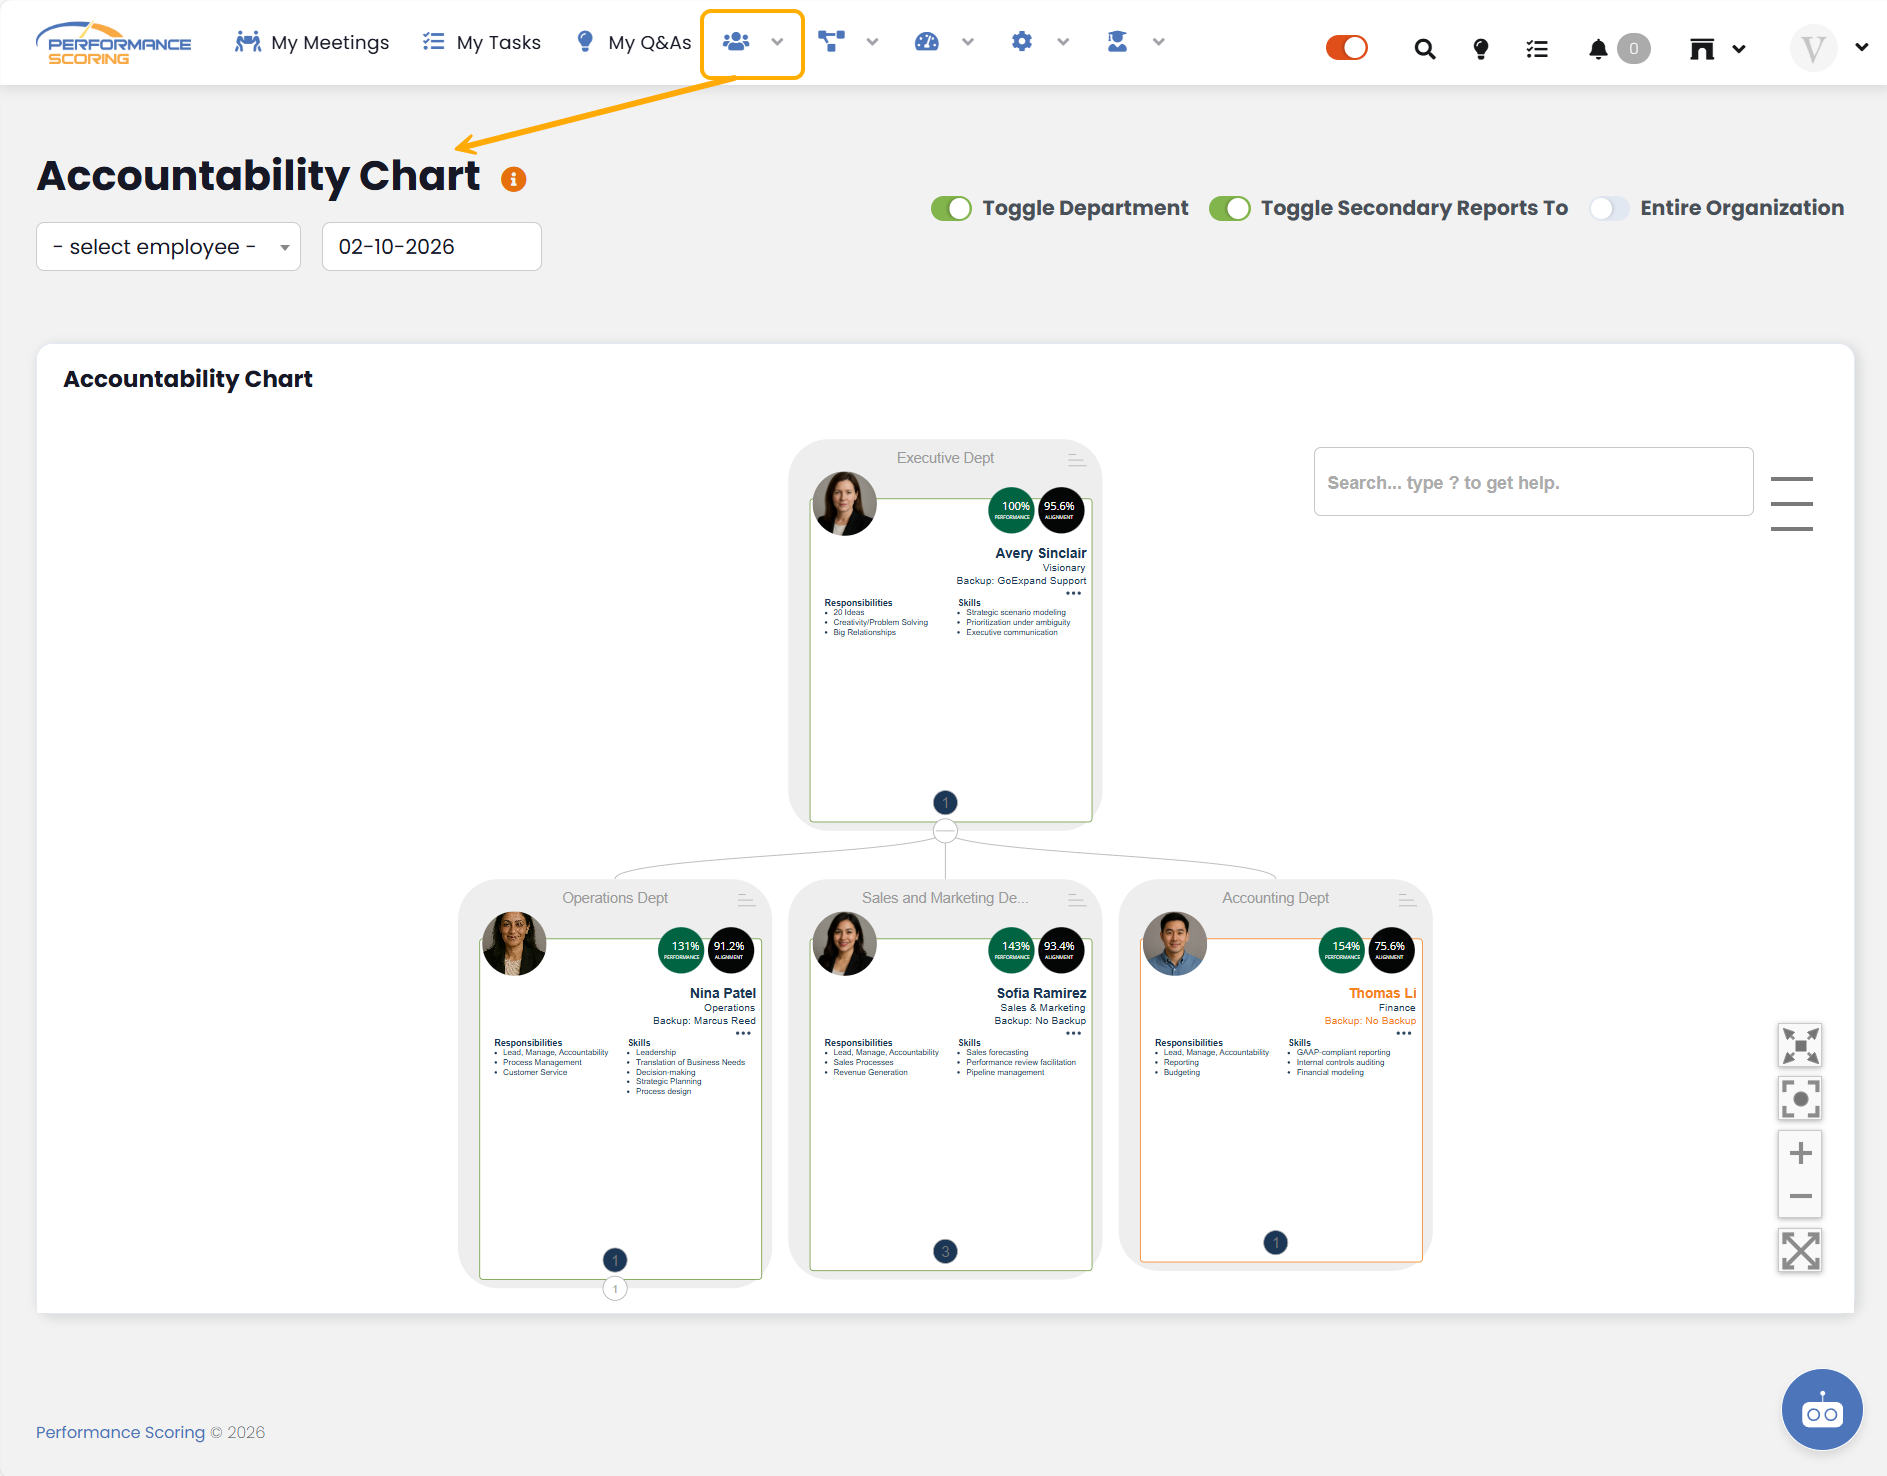
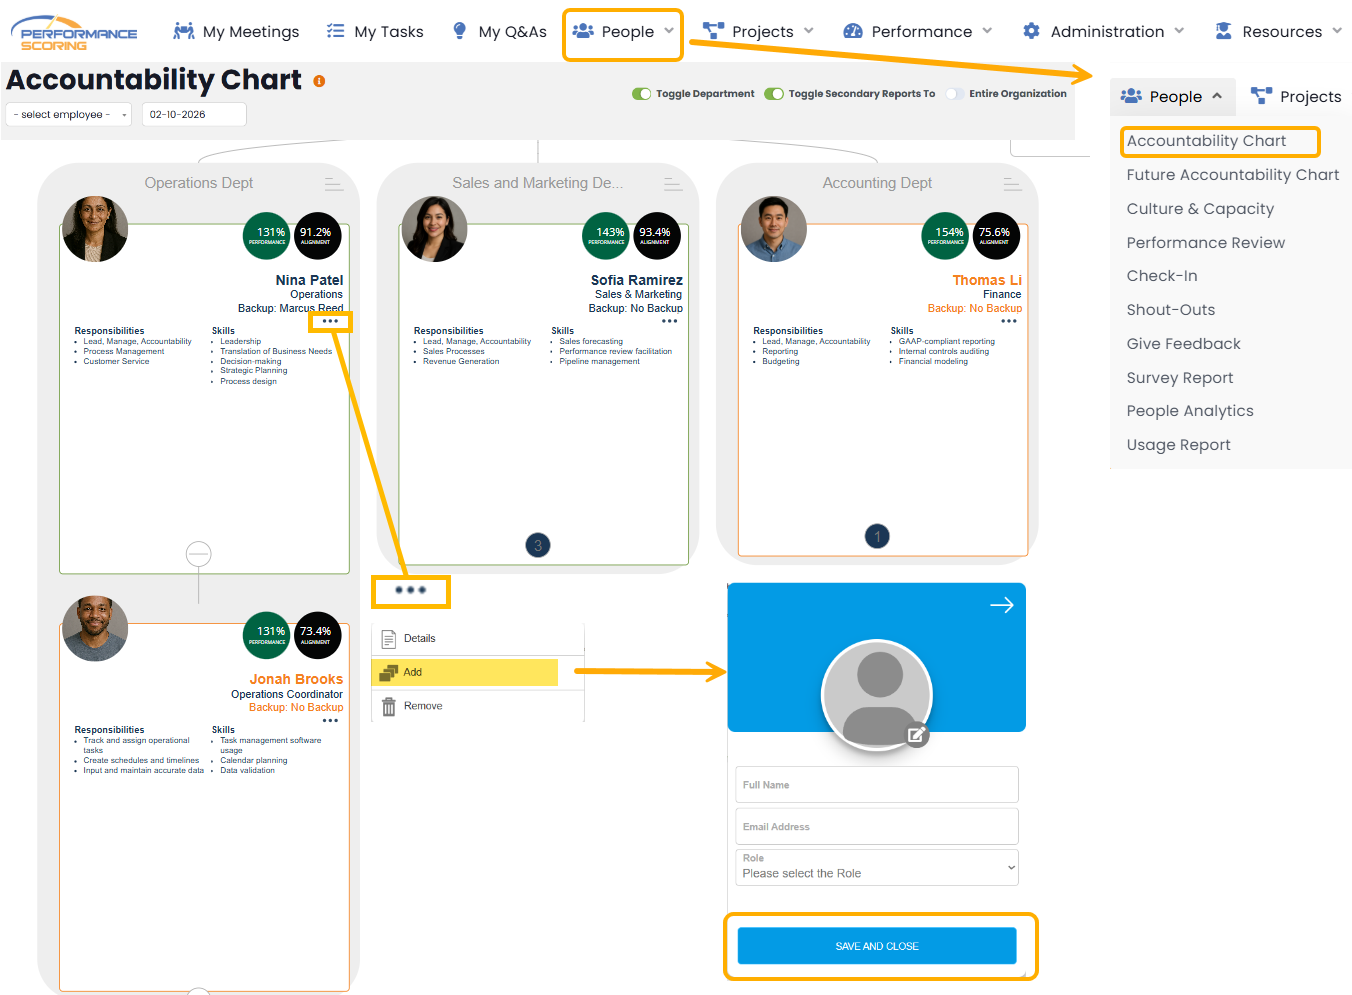
The Accountability Chart™
Accessed by navigating to the People Icon > The Accountability Chart™. This area displays all individuals that report to you and those that report to them. clicking on a user’s card.
Each user card displays their ‘Company Role’ as well as their Ring Chart and general information. Further information can be accessed by clicking on a user’s card.
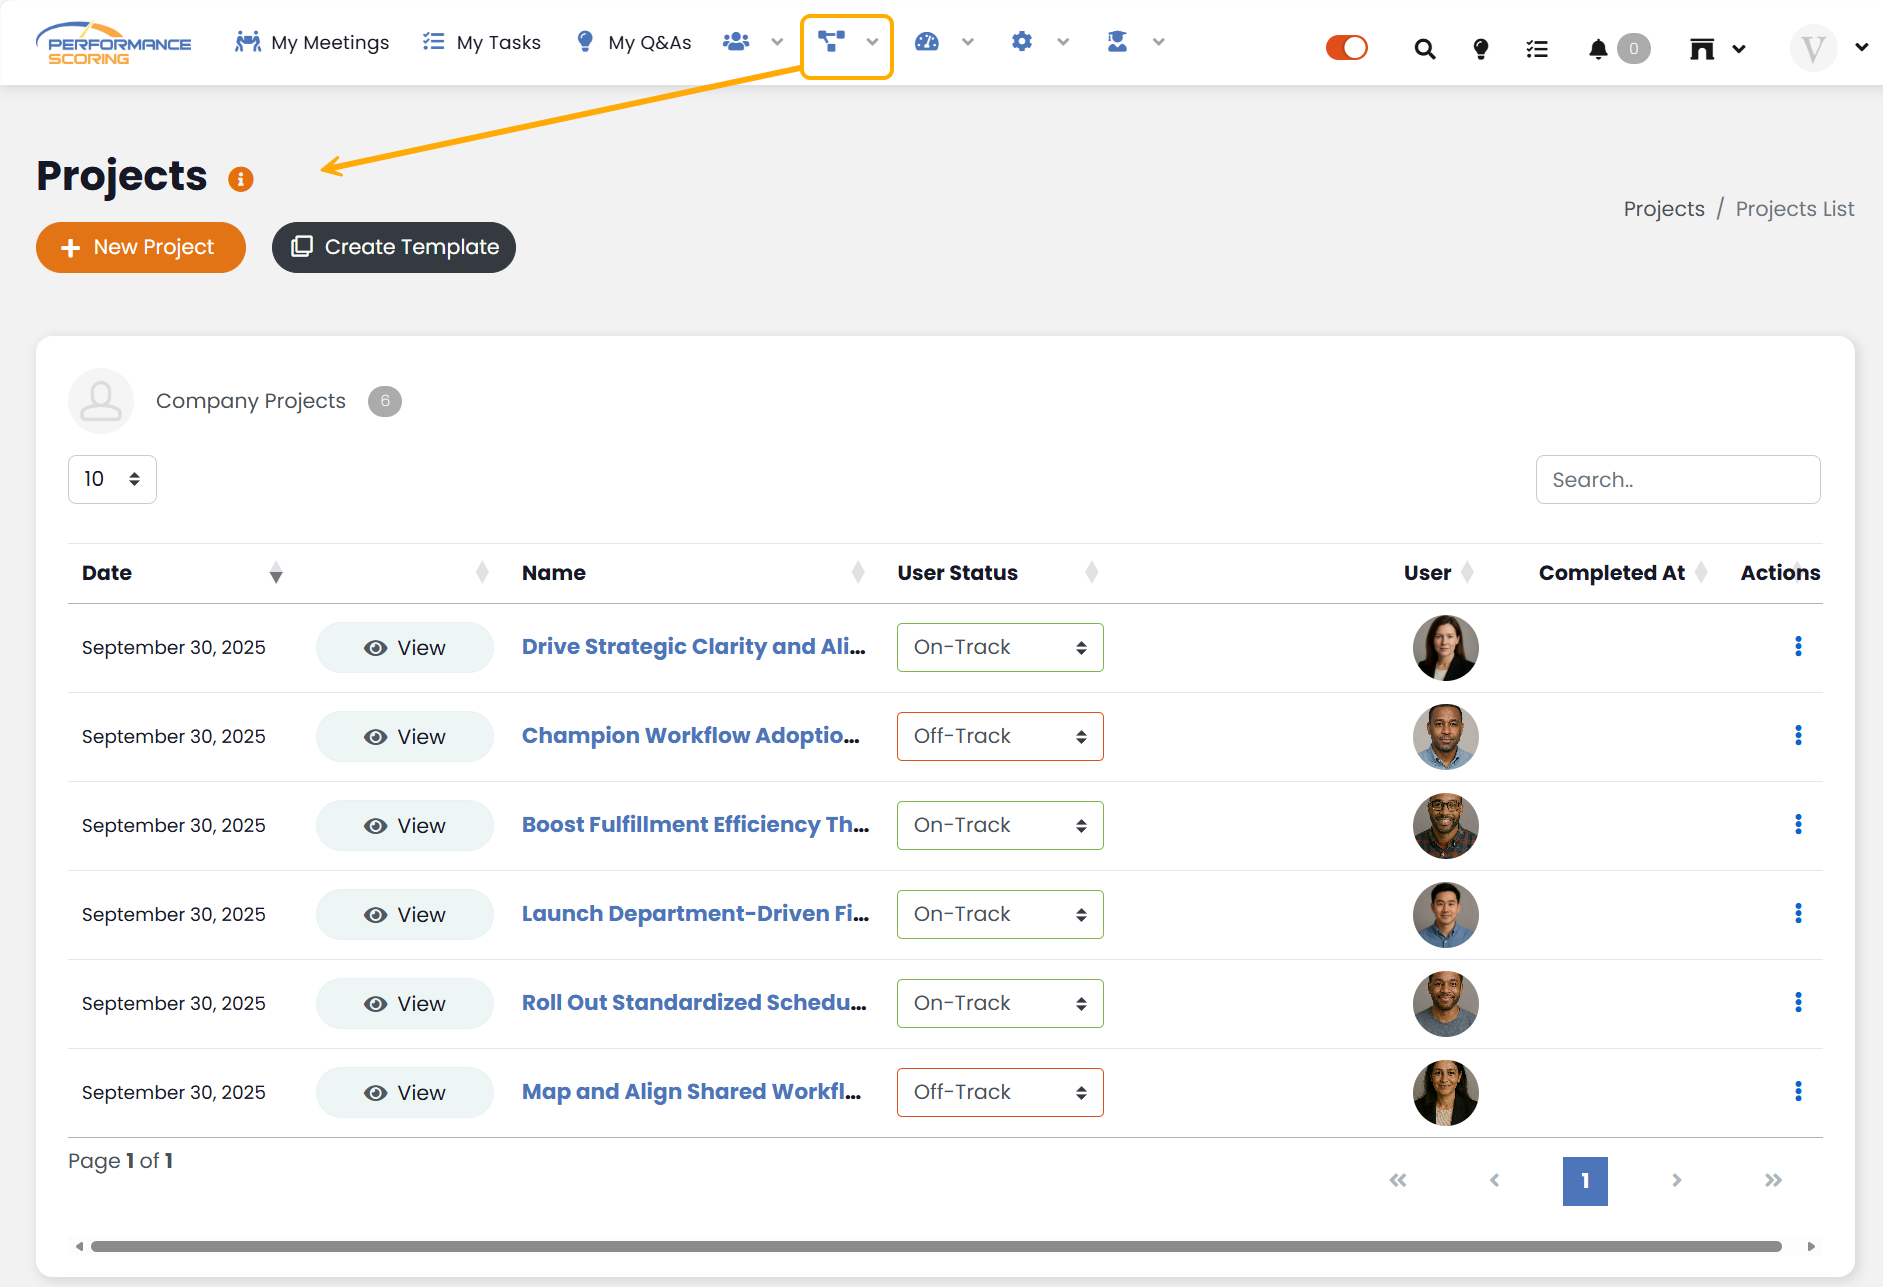
Projects
To create or access your ‘Projects’, navigate to Projects > Projects List. This page will display all Projects you have access to as the owner or as a viewer, or team member.
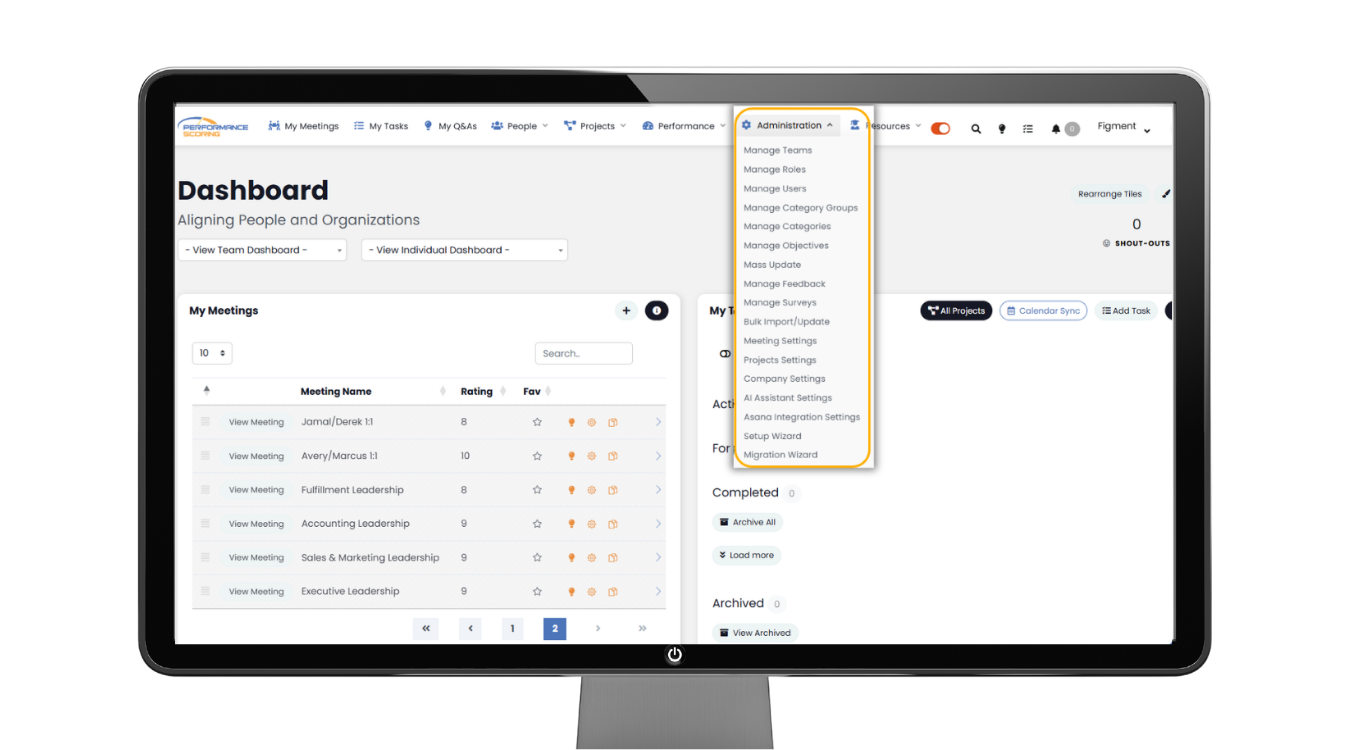
Administration
The ‘Administration’ dropdown is where admin/champion users will go to update settings and manage the majority of the “back end” of the platform regular users never see.
*If you are involved in the company setup, you will spend plenty of time here.
Step 2: Organization Setup
Now that you have a grasp of the core navigation of Performance Scoring, it’s time finish setup of your company. Tackling the following items in the order listed will ensure your organization is set up on a firm foundation for company-wide use of all Performance Scoring offerings.
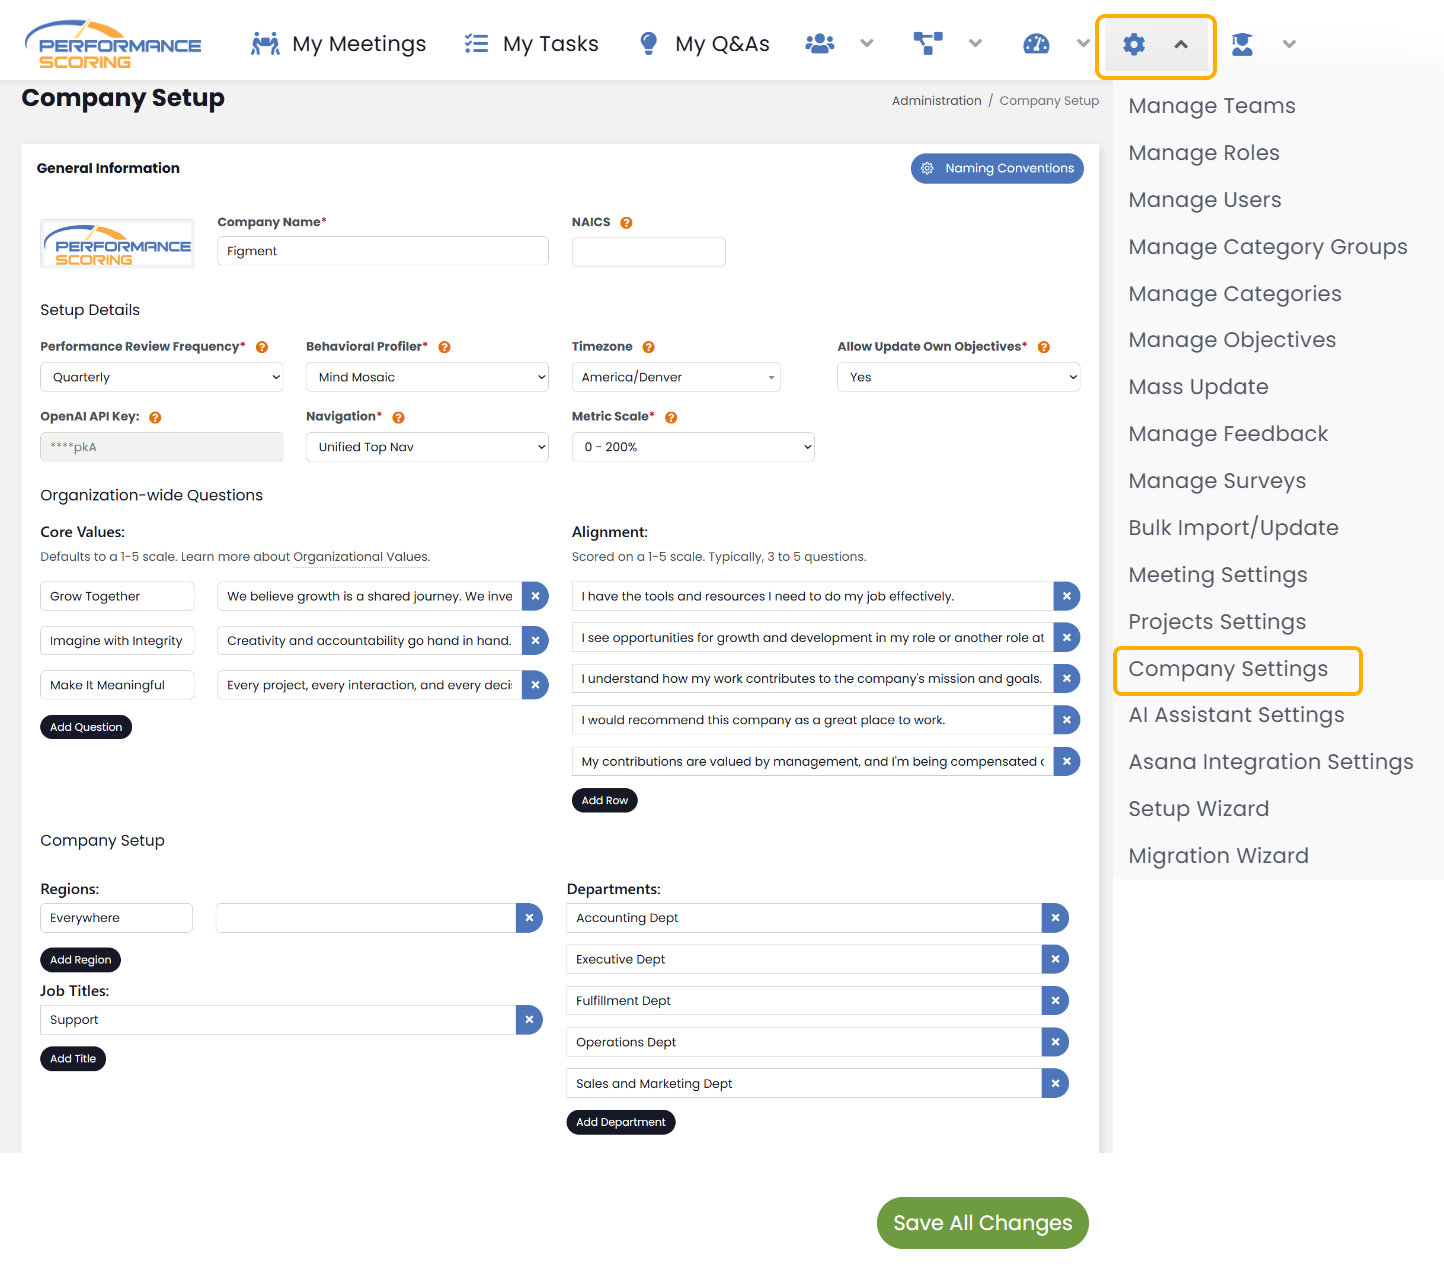
Company Settings
Here you will see all items chosen during the company’s creation. Take some time to confirm all areas, especially Core Values and Engagement as these will play a role in feedback and performance reviews. It’s also good to verify your ‘Departments’ as this will tie into ‘Group Users’ in The Accountability Chart™.
*Changes can be made as needed to any of the items listed.
Make sure to SAVE your changes at the bottom of the page.
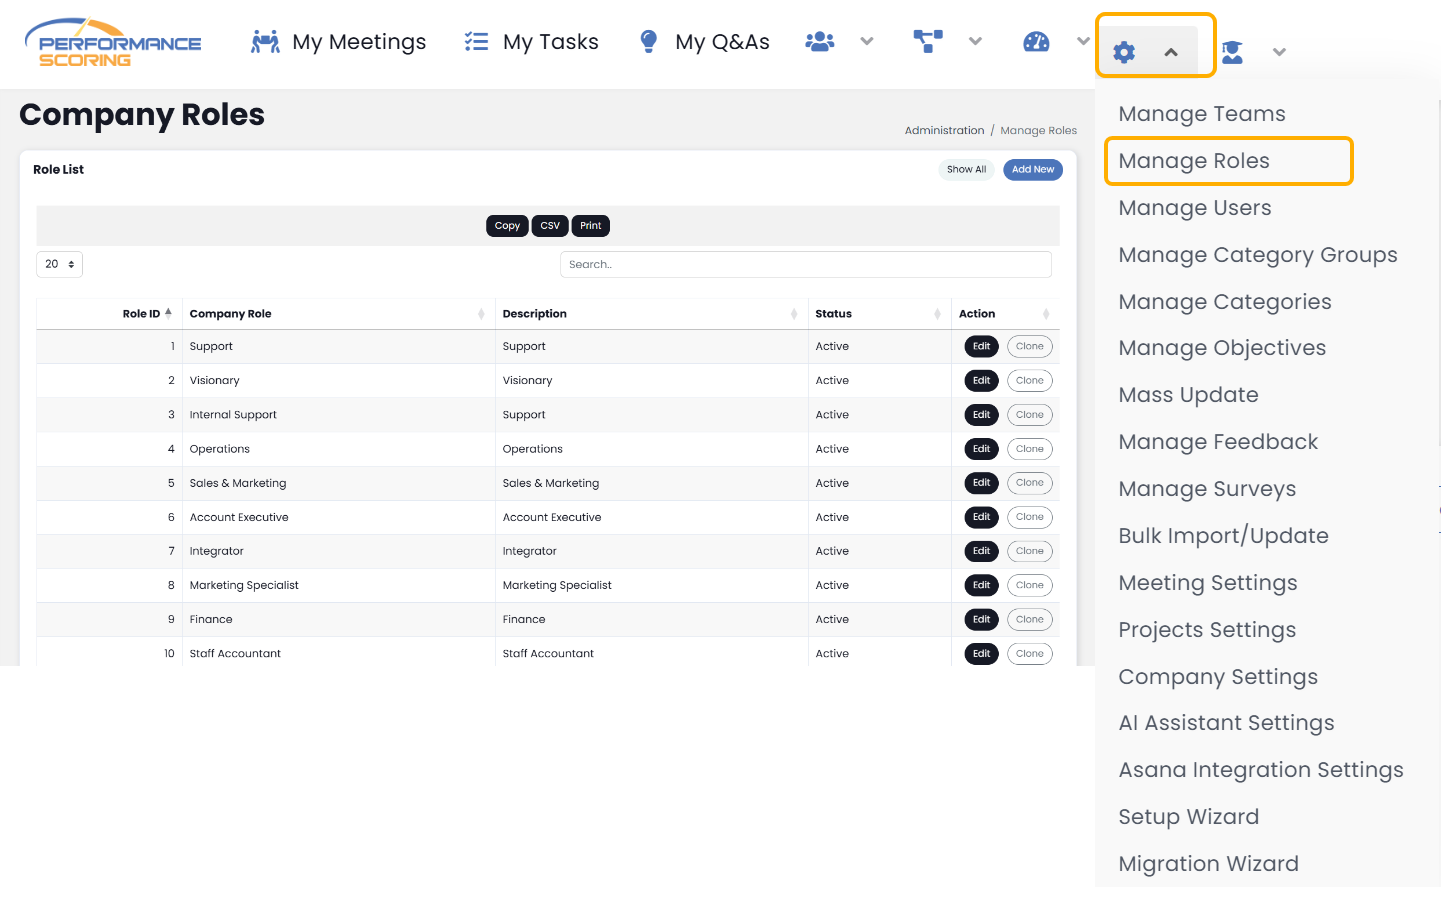
Manage Role
Your application comes pre-loaded with 10 ‘Company Roles’. Users added during company creation were assigned one of these 10 Roles. Any New Users added later will need to be assigned one as well.
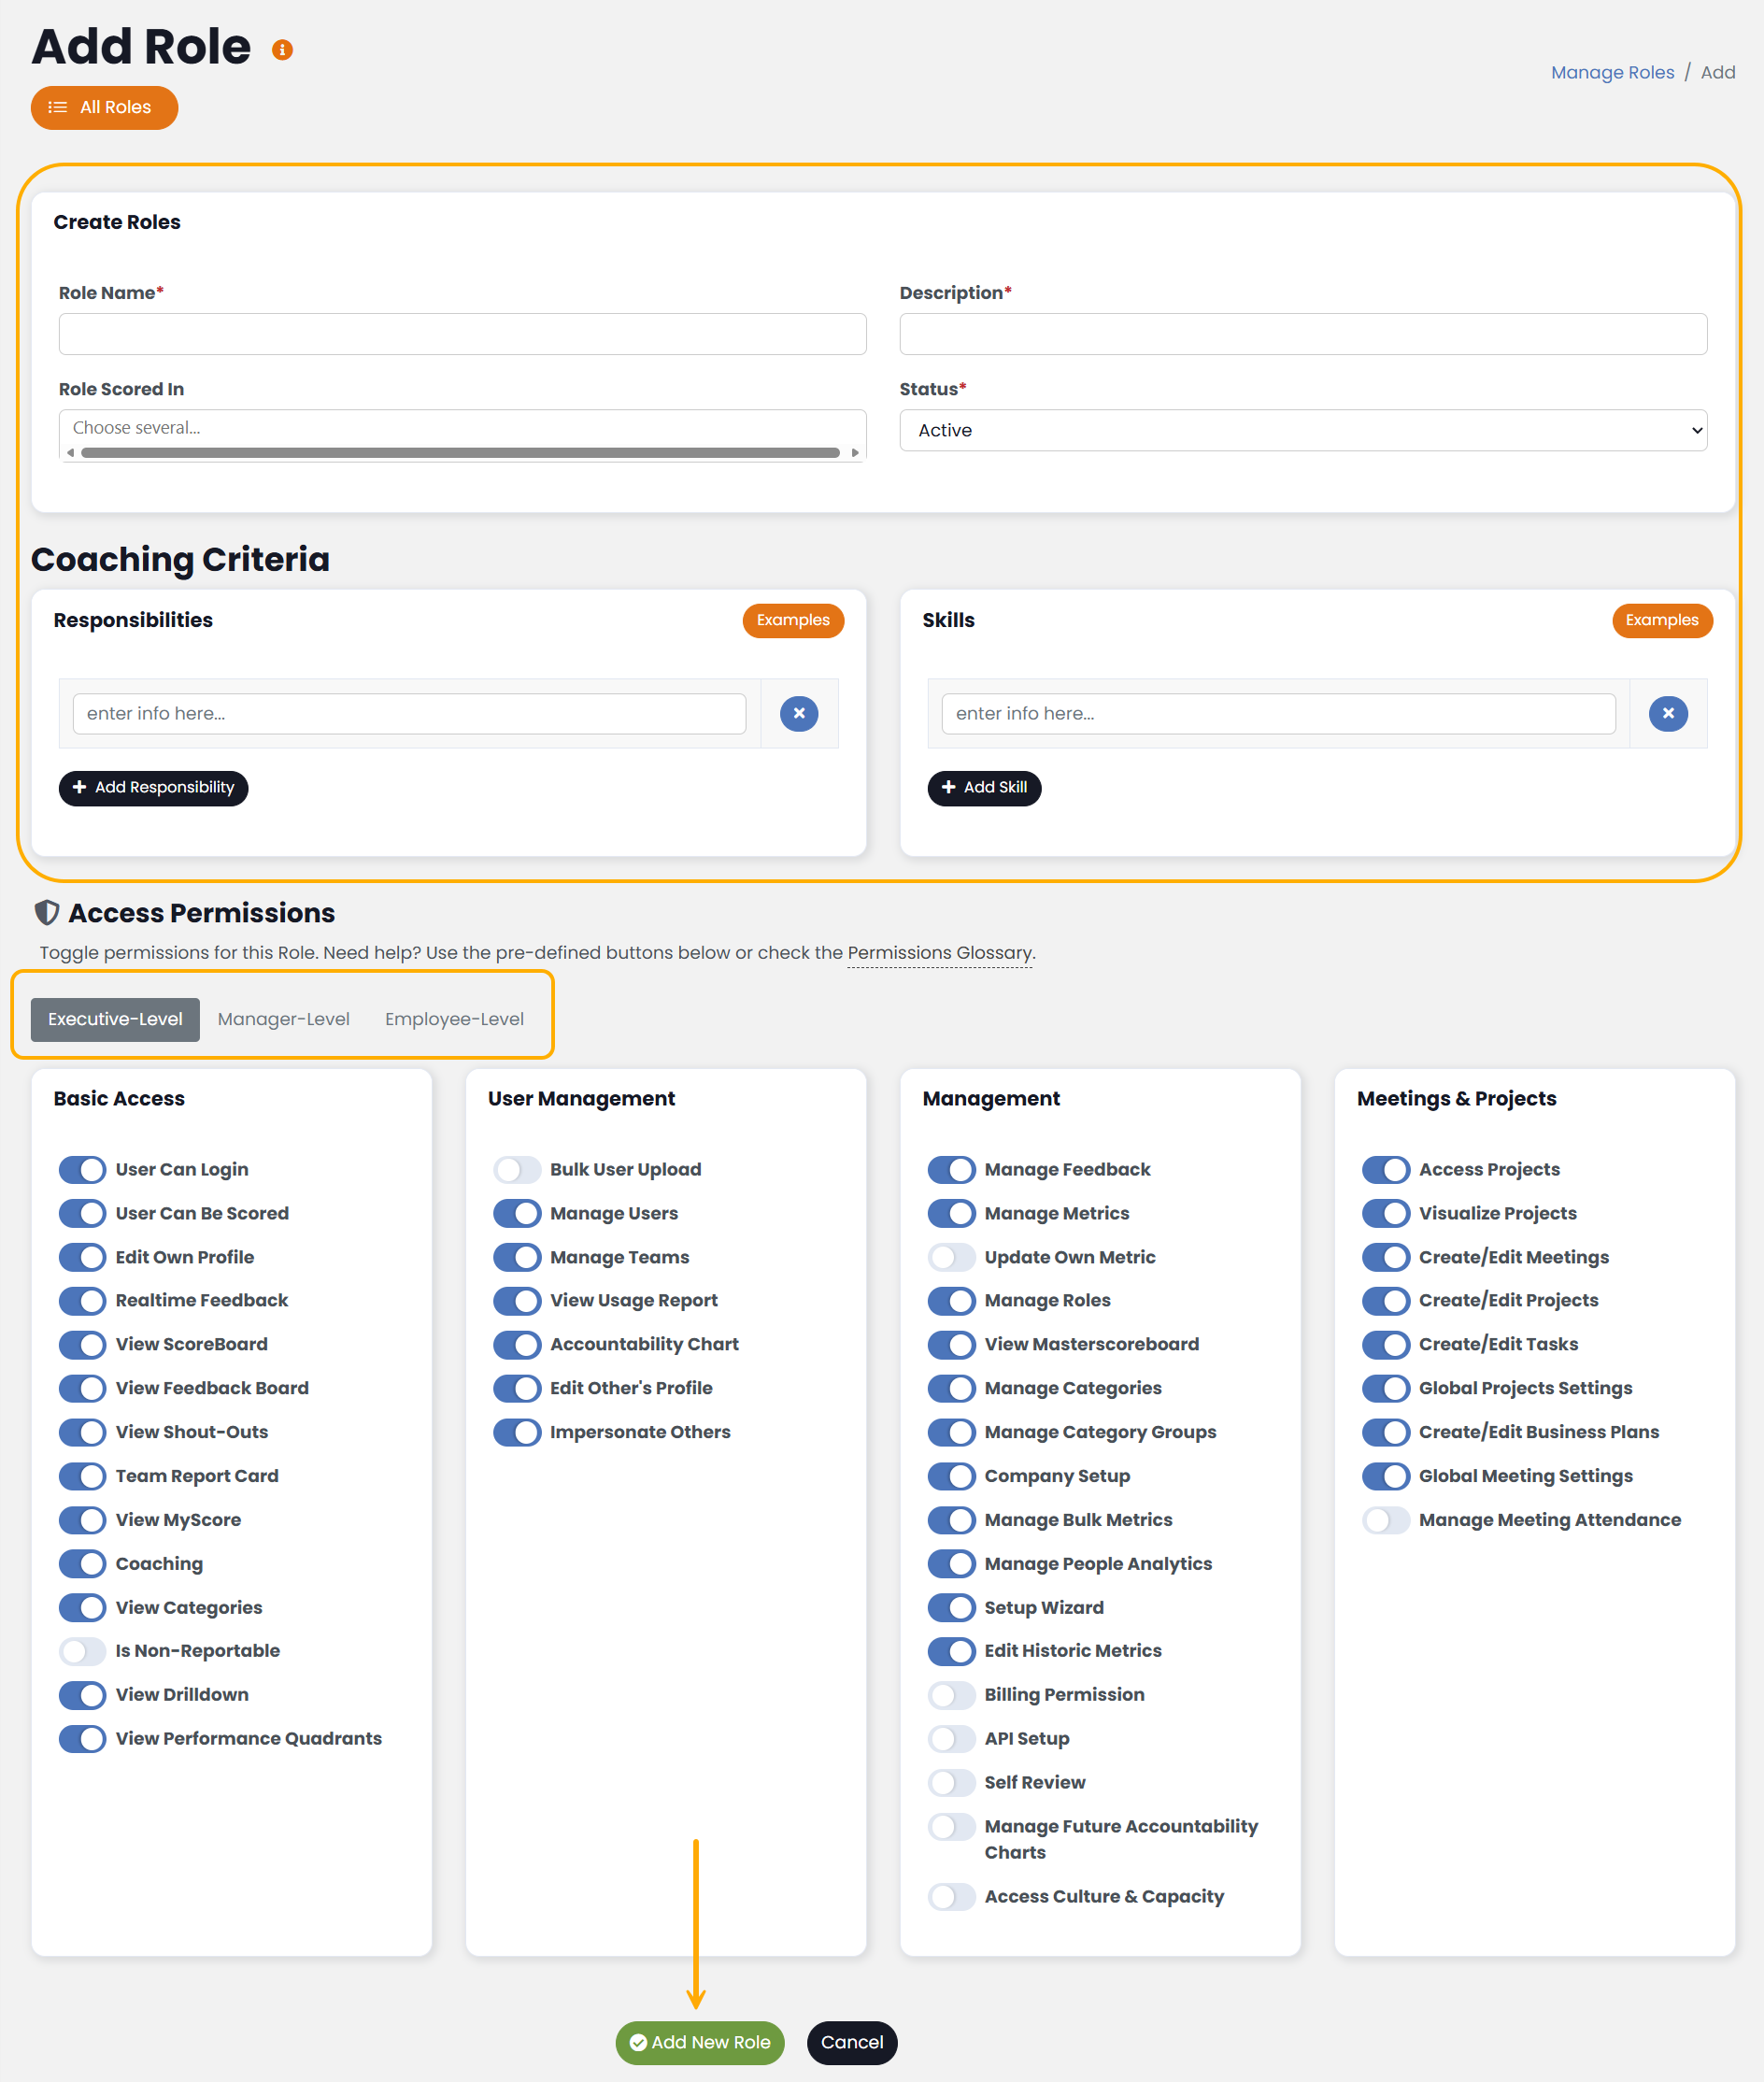
Add New Role
Each ‘Company Role’ has its own details and permissions that are used throughout the platform. To create a new Role, simply clone an existing one – this will carry over all the permissions of the cloned Role or select, Add New.
Fill in required fields, fill in the role’s Responsibilities and Skills – the Skills section feeds into the Performance Reviews for users.
Permissions can be filled out manually or can be setup with Executive, Manager or Employee level permissions tabs.
Make sure to Save any changes made.
Manage Users
Users can update their own personal information, but admin users will need to access ‘Manage Users’ from time to time to update specific information for employees.
Upon first logging in, champions should verify the user profiles of top-level employees in the following areas:
· Department: Groups users in The Accountability Chart™ and used in data filtering.
· Function: Assigns Function-specific items to each user (discussed earlier).
· Reports To Primarily: The user’s manager. Important for reporting structure and visibility.
We encourage users to add a profile picture or avatar for other users to quickly identify their activity throughout the platform.

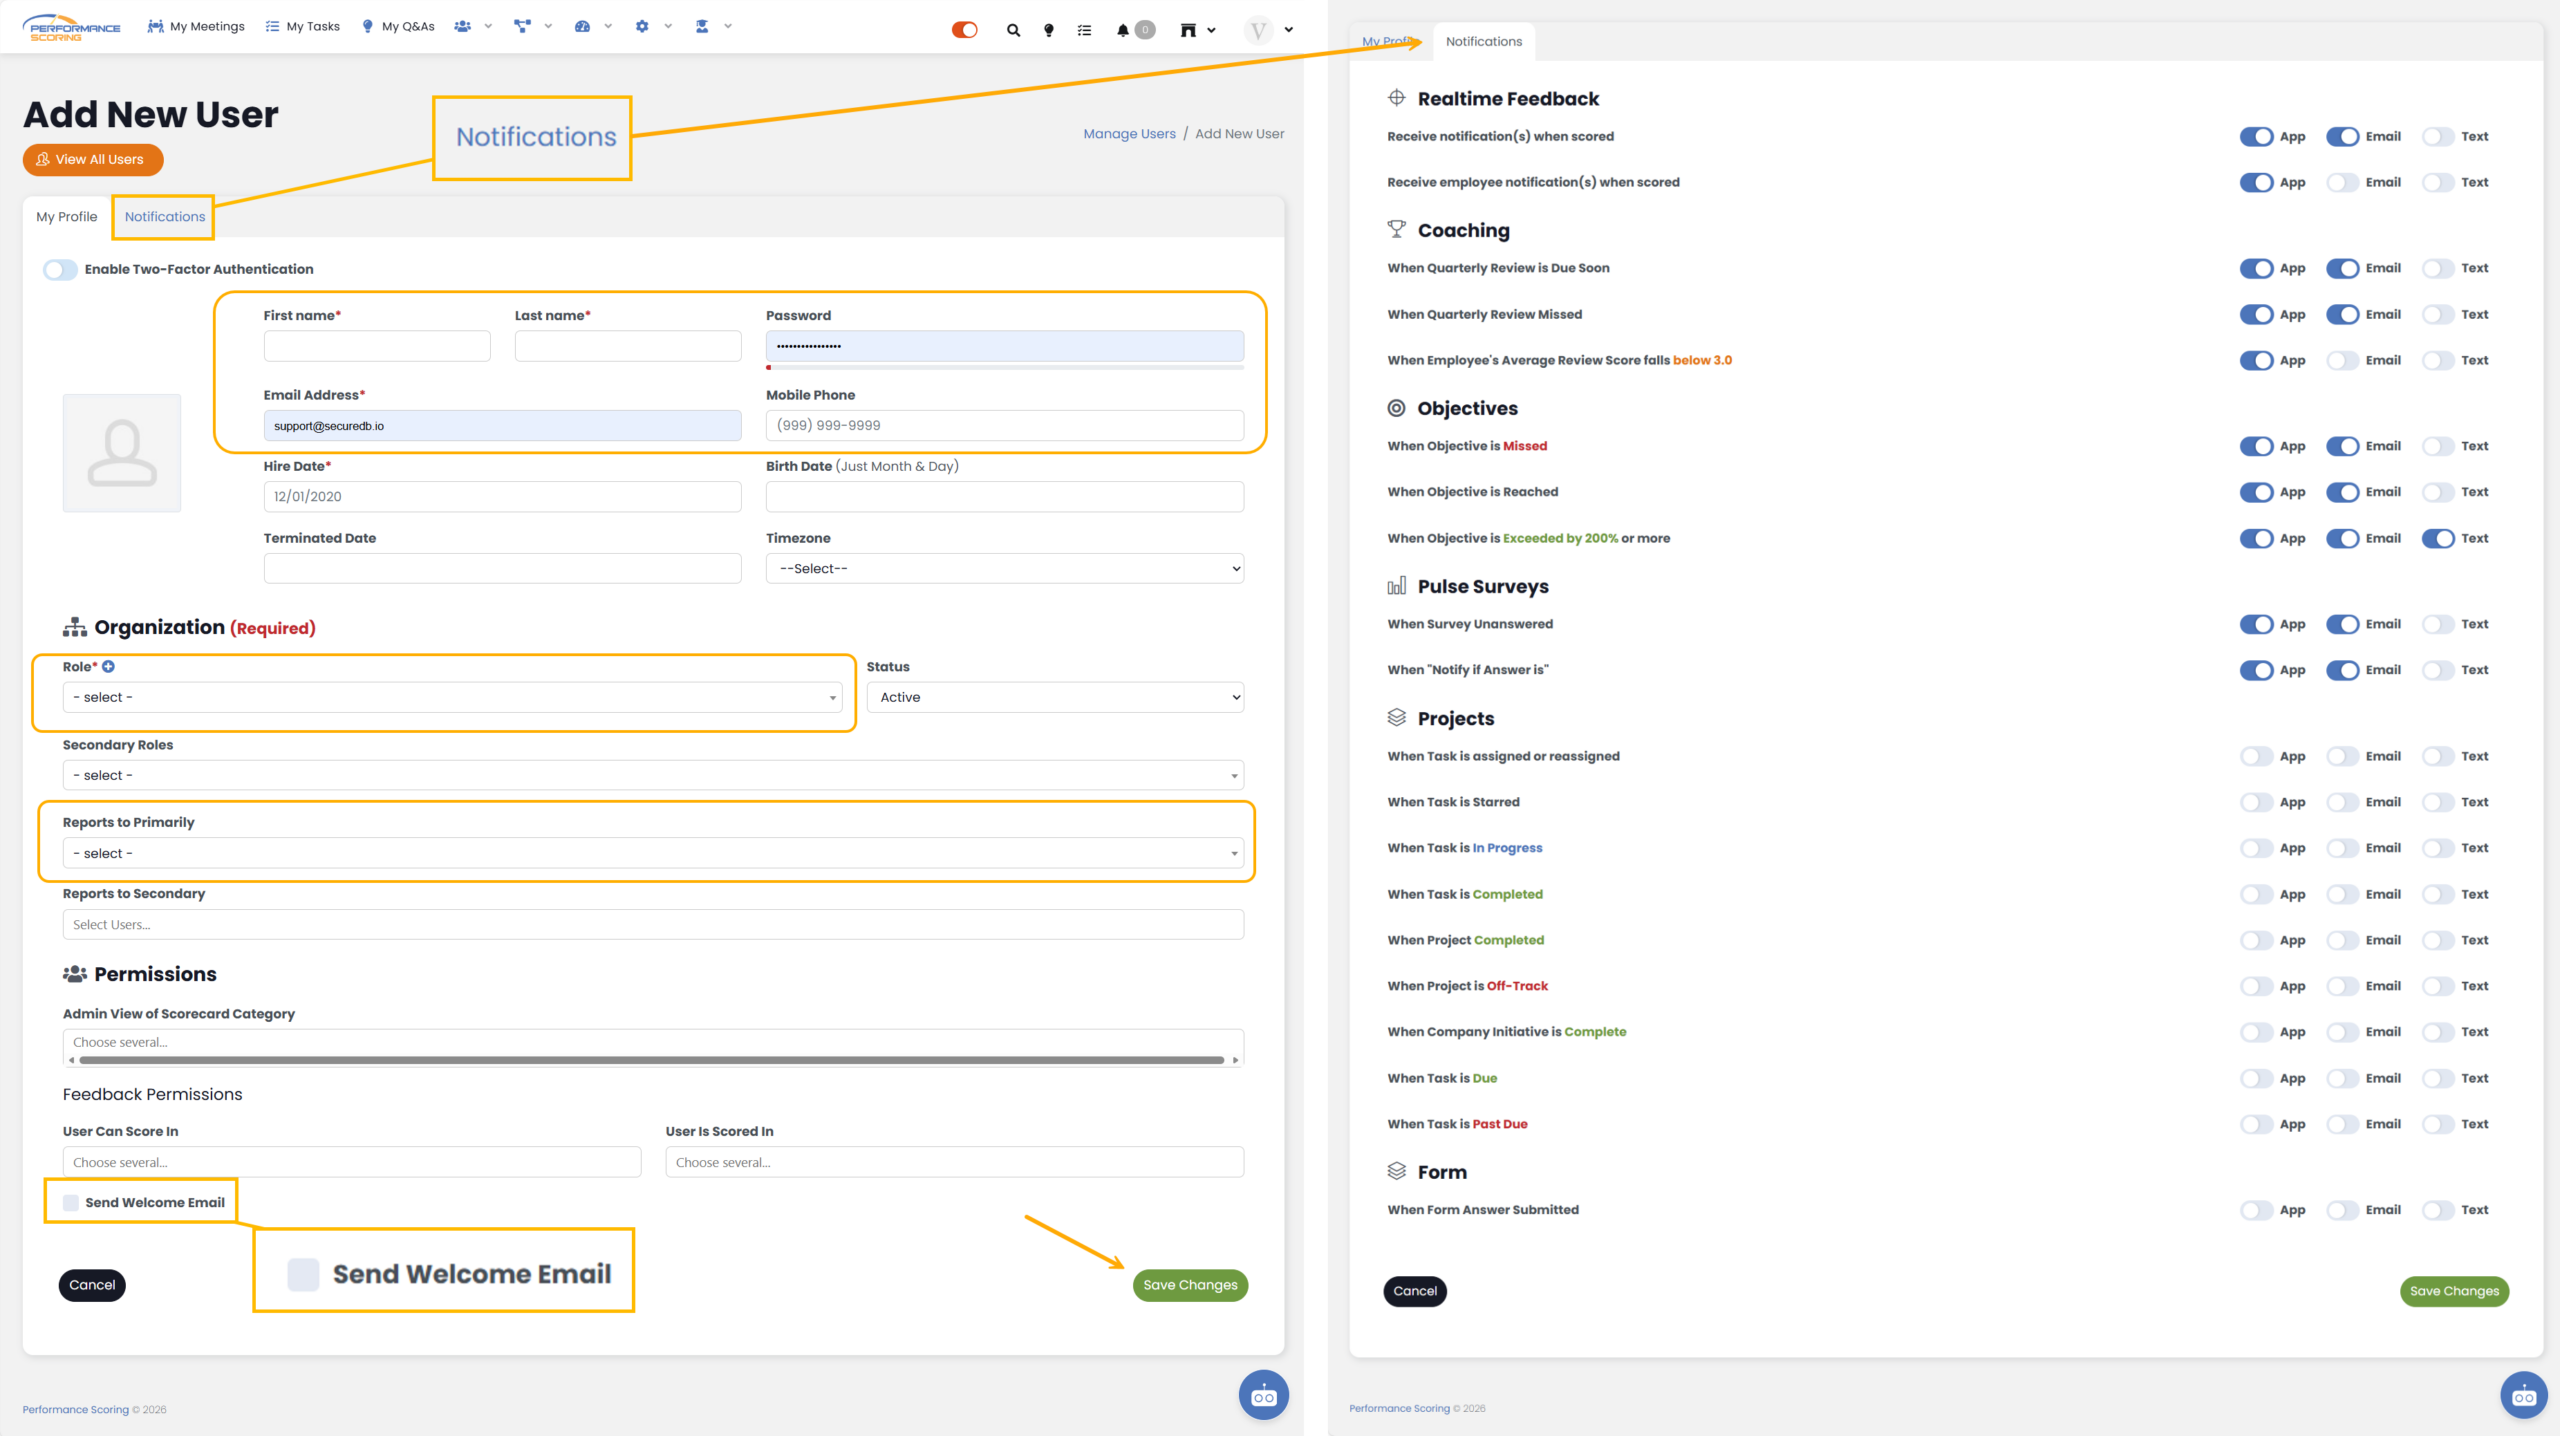
Add New User
Users can be added individually via ‘Manage Users’ or directly from ‘The Accountability Chart™’
To Add New User from the navigation panel, navigate to Adim > Manage Users > Add New
Required Fields: First name, last name, email and the user’s Role.
Optional, but highly recommended, are Department and Reports to Primarily – with the latter used to populate the Accountability Chart.
Users are able to update Notifications as well by selecting the tab next to My Profile.
Send Welcome Email (optional) and Save.
All other information can be updated later by individual users to include their password once the Welcome Email has been sent.
Add a new user through the ‘The Accountability Chart™’
Navigate to People > Accountability Chart.
Next choose the existing user the New User will Report to and click the three dots to open a small window.
Choose Add and a new window will pop-up to quickly add the New User under the existing user. Make sure to Save and Close.
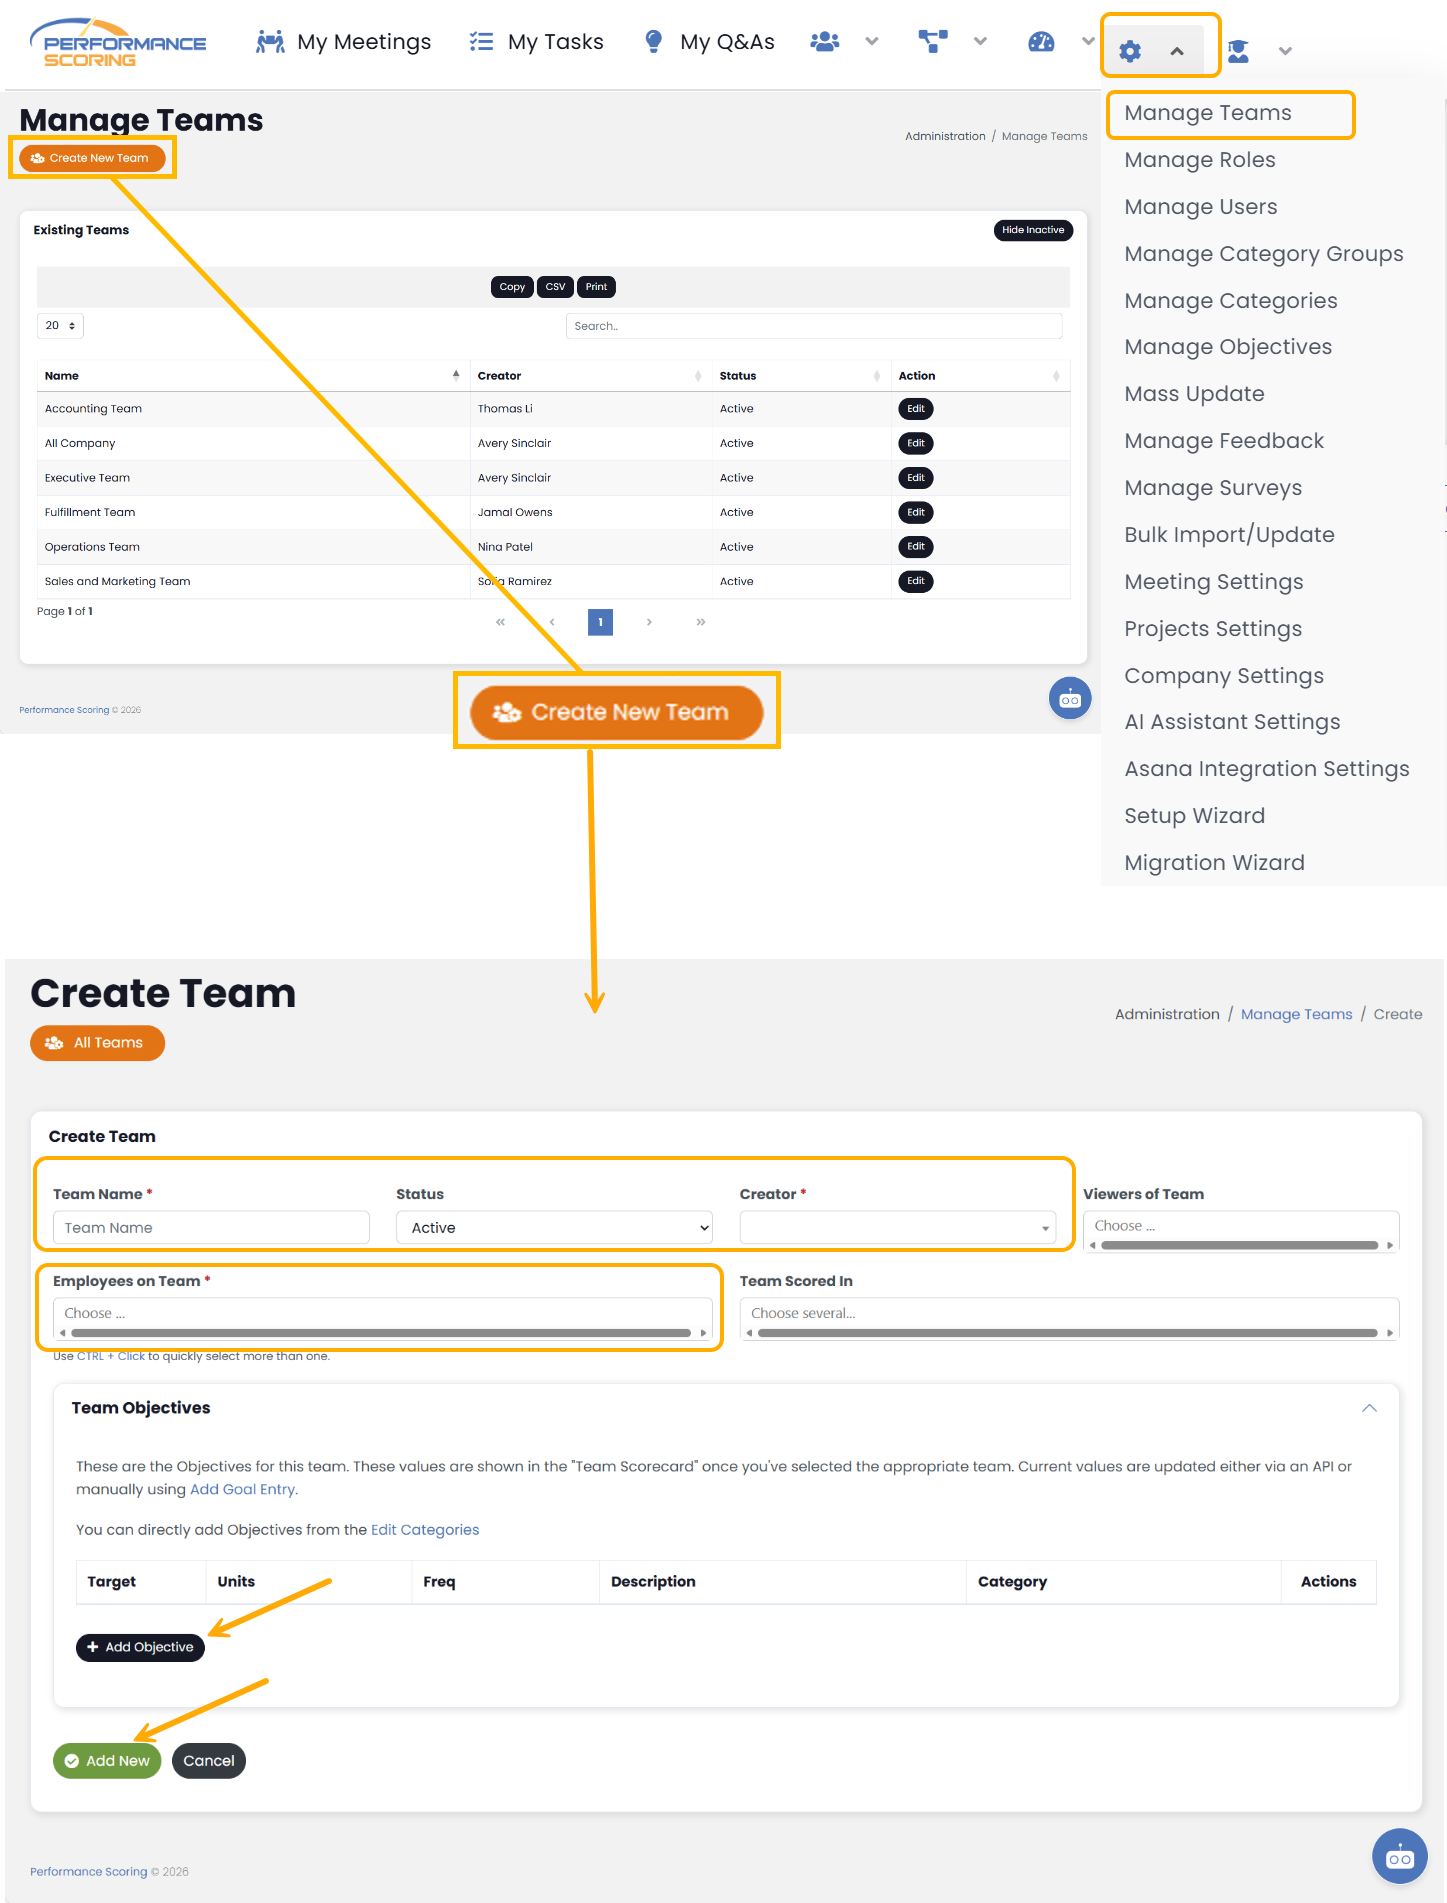
Step 3: Create New Teams
Now that you’ve added all users, it’s time to create you teams. Teams are what drive the Team Dashboard and are very useful when creating meetings, 1–3-year goals or assigning Task or feedback to multiple users at a time.
To add a team, navigate to Administration > Manage Teams, then select ‘Create New Team’ from the upper left-hand side.
Assign the ‘Team Name’ (mirroring department name is an easy start), assign a ‘Creator’ (usually the manager of the team), and select ‘Viewers’ (users not included in team calculations who need to interact with the team), and then select ‘Employees on the Team’. Complete team creation by clicking the ‘Add New’ button at the bottom.
Additional training assistance:
See the full Knowledge Base Training Course here!
>Up Next: Basic User Setup in Performance Scoring